
If you’ve spent any time in gardening circles lately, you may have heard whispers of a new seed-starting trend: seed snails. They’re rolled, they’re compact, and they somehow manage to grow a shocking number of seedlings in a very small space.
Think of seed snails as the studio apartment of seed starting; efficient, cozy, and surprisingly productive.
What Is a Seed Snail?
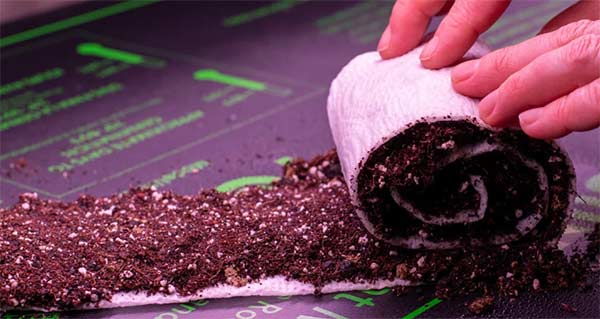
A seed snail is a strip of flexible material filled with moist potting soil, gently rolled into a spiral and stood upright. Seeds are planted along the top edge, and the whole thing sits snugly in a tray like a collection of leafy cinnamon rolls.
Gardeners love this method because it:
- Saves space
- Uses far less soil
- Makes transplanting easier
- Costs almost nothing to try
How to Make a Seed Snail (Step by Step)
What You’ll Need
- Flexible material (foam packing wrap, bubble wrap, or similar)
- Potting soil (lightly moistened)
- Seeds
- Tape, twine, or a rubber band
- A shallow tray or container
- Plant labels (trust us, you’ll forget what’s what)
Step 1: Cut Your Strip
Start with a strip about 6 inches tall and 18–24 inches long. Longer strips = more planting spots.
Step 2: Add Soil
Spread a ½-inch layer of moist potting soil across the strip, leaving about ½ inch bare at the top edge so soil doesn’t spill everywhere when you roll.
Soil should feel like a wrung-out sponge, not a swamp.
Step 3: Roll It Up
Roll the strip into a loose spiral, like a jelly roll, not a burrito under pressure. Secure it gently with tape or twine and stand it upright.
Congratulations. You’ve made a snail.
Step 4: Plant Your Seeds
Plant seeds along the top edge at their recommended depth. Light-requiring seeds stay on the surface; others get tucked in gently.
Mist lightly to settle everything in place.
Step 5: Set It Up
Place your snails snugly in a tray so they don’t tip over. Cover loosely if you want faster germination, but remove covers and heat mats as soon as seeds sprout. Seedlings like warmth to start, not to live forever.
Step 6: Care After Sprouting
- Move under grow lights immediately
- Keep lights 2–3 inches above seedlings
- Water gently (many people bottom-water once roots develop)
- Provide airflow
Seed snails follow the same care rules as traditional trays—they’re just better at playing Tetris.
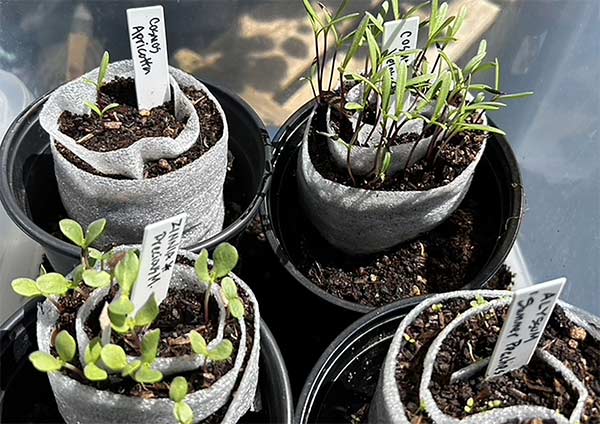
Label Everything (Unless You Love Surprises)
Seed snails may save space, but they do not save memory.
When multiple seedlings sprout along the same spiral, it becomes nearly impossible to tell what’s what later, especially once everything is green and adorable. Always label:
- The crop
- The variety
- The date planted
Attach the label to the snail itself or place it directly in the tray holding the snail. “I’ll remember” is a lie we tell ourselves every spring.
Proper labeling saves time, avoids accidental plant swaps, and prevents the dreaded “What is this?” transplant moment in the garden.
What Crops Work Well in Seed Snails? (Two Very Helpful Paragraphs)
Seed snails shine for plants that benefit from an early indoor start or transplant easily. Gardeners commonly use them for cool-season crops like lettuce, spinach, kale, broccoli, cabbage, and other brassicas, since these can be planted out early and don’t need huge root space at first. Onions, leeks, and green onions are also fan favorites—you can grow a lot of starts in one snail and separate them easily later.
They’re also popular for herbs and flowers (think basil, cilantro, dill, zinnias, cosmos, marigolds), and many gardeners experiment with tomatoes, peppers, and cucumbers for long-season crops. These larger plants can work well—as long as gardeners remember that seed snails are a starter home, not a forever house. Bigger crops usually need to be potted up sooner than they would in traditional trays.
Transplant Timing (Don’t Ghost Your Seedlings)
Seed snails make transplanting easy—but timing matters.
Transplant when:
- True leaves appear
- Roots are crowding the bottom
- Seedlings start competing for light or space
Simply unroll the snail, gently separate the seedlings, and pot up or plant out. No root wrestling required.
Materials & Sustainability: Let’s Talk Plastic (Without Panic)
Yes, many seed snails use plastic materials like packing foam or bubble wrap. And yes, gardeners are understandably concerned about microplastics. That said, most seed starting already involves plastic: trays, pots, domes, labels, irrigation trays… the list is long.
The key difference is reuse. Many gardeners repurpose sturdy packaging materials and use them season after season, thereby reducing overall waste. Biodegradable options like paper or cardboard can work for fast crops but tend to break down quickly and may tangle roots. A practical, balanced approach that reuses durable materials and handles soil thoughtfully keeps seed snails in line with realistic, everyday gardening practices.
In short: if you already start seeds in plastic trays, seed snails aren’t suddenly tipping the sustainability scales.
Common Snail Pitfalls (Quick Hits)
- Leggy seedlings: usually too little light, too much water, too much heat, or too much fertilizer
- Mold: soil too wet + poor airflow
- Toppling snails: pack them snugly in a tray
None of these are snail-specific—seed snails just make them easier to spot.
Final Thought
Seed snails aren’t magic. They’re just clever. They save space, save soil, and make seed starting approachable—especially for gardeners working with limited room or big ambitions.
And honestly? Anything that makes seed starting feel a little more fun (and a little less intimidating) is worth a roll.