
Winter sowing is a simple, brilliant method for starting seeds outdoors during the cold months, using mini-greenhouses such as milk jugs, clear bins, or other recycled containers. Instead of coddling seedlings under lights indoors, you let natural winter conditions — cold temperatures, moisture, sunlight, and gradual warming — signal the seeds when it’s time to sprout. It mimics how plants grow in nature, only with a little organized help from you.
And why should you care? Because here in Zone 6b, high-country Arizona, our growing season can feel short, our sunlight is intense, and indoor seedlings often struggle to stay sturdy without a lot of extra equipment. Winter sowing gives us strong, weather-tough plants that are already acclimated to our climate. It saves space, saves time, reduces transplant shock, and makes the whole seed-starting process feel less like babysitting and more like partnering with nature.
In other words — it’s practical, economical, climate-smart… and just a tiny bit magical.
It’s like outsourcing to Mother Nature — and she’s been doing this a long time.
Let Nature Do the Heavy Lifting (While You Sip Tea and Smile)
If you’ve ever looked outside in February and thought, “Surely I should be growing something…” — good news. You can. And you don’t even need grow lights, heat mats, or a spare bedroom turned into a jungle.
Welcome to winter sowing, the wonderfully low-maintenance, slightly magical method of starting seeds outdoors in winter so nature can handle the timing. Yes, really. No pampering required.
Here in our beautiful high-country Rim area, winter sowing is not only possible — it’s downright practical. It gives us sturdy, cold-adapted seedlings that transplant beautifully when spring finally makes up its mind.
Let’s dig in. (You knew I’d say that.)
What Is Winter Sowing?
Winter sowing is the practice of planting seeds outdoors during winter in protected mini-greenhouses (like milk jugs, bins, cold frames, or even ziplock bags). The seeds experience natural cold, moisture, and light cycles — just like they would in the wild.
When conditions are right?
They sprout on their own schedule.
No hovering. No daily misting. No stretching seedlings reaching for weak window light.
It’s like outsourcing to Mother Nature — and she’s been doing this a long time.
Why Winter Sowing Works In Our Area
1. Natural Stratification
Many seeds require a cold period to germinate. This is called cold stratification. Winter sowing gives them exactly what they need.
2. Stronger, Stockier Seedlings
Outdoor light = stronger stems.
Indoor window light = leggy drama queens.
Winter-sown seedlings are compact, sturdy, and already acclimated to wind and temperature swings.
3. Less Hardening Off
Because they’ve lived their whole lives outdoors, transplant shock is minimal.
4. Perfect for Our Short Season
Starting cool crops early means we maximize every precious growing week in our high-elevation climate.
Methods We’ve Tried (and Loved)
You’ve already started experimenting — milk jugs, seed snails, bins, ziplocks — and that’s fantastic. Here are the main methods (plus a few extras to try):

#1 Milk Jug Mini-Greenhouses
How it works:
- Cut the jug nearly in half.
- Add drainage holes.
- Fill with 3–4 inches of potting mix.
- Sow seeds.
- Tape closed and remove cap (ventilation).
- Set outside in the sun.
Best for: Cool vegetables, hardy annuals, and perennials requiring stratification.
#2 Seed Snails in Bins
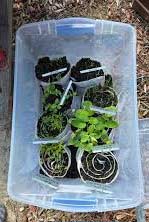
Seed snails are fun, space-efficient, and honestly… adorable.
Place them inside a clear tote with the lid slightly ajar for airflow. The bin becomes your mini greenhouse.
Best for: Cool crops and flowers that will be transplanted while still small.
#3 Bonus Winter Sowing Method: “Ziplock Baggies on a Line” (Yes, Really)
If milk jugs are the classic winter sowing workhorse, this method is their quirky, lightweight cousin: ziplock bags filled with damp potting soil, seeded, partially closed for airflow, and set outdoors so rain/snow can help keep things evenly moist.
This approach works for the same reason winter sowing works anywhere: the seeds experience natural cold + moisture + warming cycles that break dormancy and trigger germination at the right time.
What you’ll need
- Gallon ziplock bags (freezer-grade is sturdier)
- Potting soil / seed-starting mix (moistened to “wrung-out sponge”)
- Seeds + permanent marker label
- Scissors
- Clothespin (to hold the bag slightly open)
- A dowel, stakes, or sturdy sticks/marker poles to thread through the tops of multiple bags and support them outside
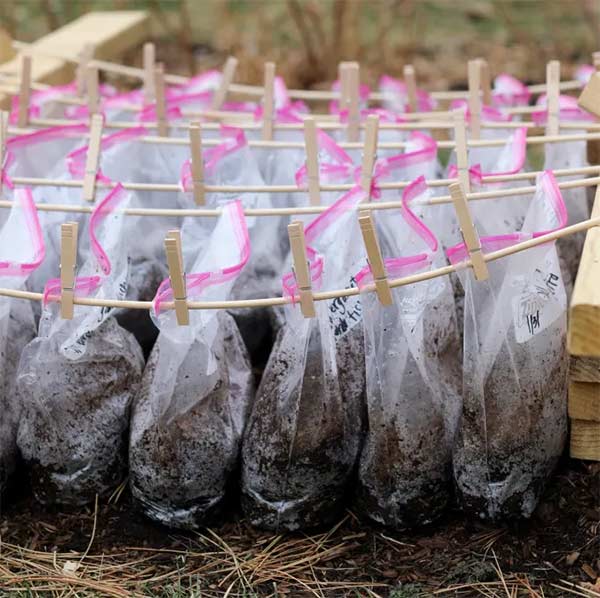
How to do it (your “bag-on-a-line” setup)
- Make drainage. While the bag is folded, snip 2–3 small triangles/slits at the bottom for drainage.
- Add damp soil. Fill the bag about ¼ full with pre-moistened mix (not soupy). Flatten it a bit.
- Sow seeds + label. Sprinkle seeds on the surface, gently press for contact, and cover only if the packet says to. Label the bag clearly.
- Leave an opening for air + weather moisture. Zip the bag mostly closed but leave about a 1–2 inch opening. Many gardeners use a clothespin to keep that gap consistent.
- String/prop the bags outside. Thread a dowel/stick through the upper portion of the bags (above the soil line) and rest the stick across raised beds, pavers, logs, or supports so the bags stay upright and lightly grounded.
- Set-and-check (not fuss-and-micro-manage). Put them somewhere bright that gets winter sun and exposure to precipitation.
Why gardeners love it
- Less bulky and less cutting/taping than jugs
- Easy to label, move, and group by plant type
- The bag “greenhouse effect” creates gentle humidity (condensation is normal)
Zone 6b tips (so your bags don’t turn into science experiments… the fuzzy kind)
- Sun can heat bags fast. As we get into spring, check more often and widen the opening on warm days so seedlings don’t cook. (Bags warm quicker than jugs.)
- Wind is real up here. Your “bags on a dowel/line” idea is perfect because it prevents them from blowing into next week.
- Moisture rule: aim for “evenly damp,” not soggy. Drainage cuts help, and that small top opening helps prevent mold.
- Spring ventilation: once you see sprouts, gradually open bags wider over several days to acclimate seedlings.
Best seeds for this method
This bag method is commonly used for hardy annuals and perennials (especially those needing cold stratification), and it can also work for cool-season crops as long as you monitor heat buildup on sunny days.
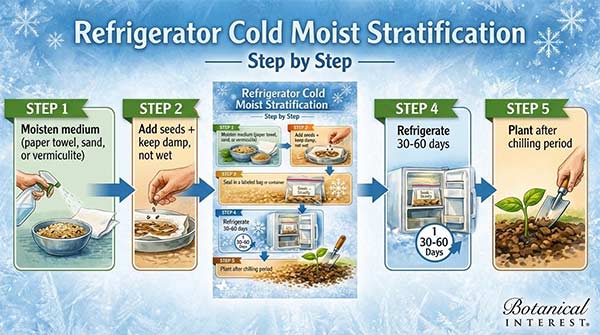
#4 Ziplock Stratification Method
For seeds that need extended cold:
- Place seeds in a damp (not wet) paper towel or sand.
- Seal in a labeled bag.
- Leave outdoors in a protected area or in the refrigerator.
- Check periodically for sprouting.
Great for: Lavender, columbine, echinacea, perennial herbs, and many native flowers.
#5 Other Methods to Consider
- Cold frames
- Unheated greenhouse benches
- Direct sowing in raised beds with row cover
- Clear salad containers (bonus recycling points!)
If it holds soil and lets in light… it can probably work.
What Should We Be Planting Now?
Let’s break it into two important categories:
Cool Crops You Can Transplant Before Last Frost
These are hardy vegetables that can handle cold soil and light frost.
| Crop | Winter Sow? | Frost Cover Needed? |
| Lettuce | Yes | Only in a hard freeze |
| Spinach | Yes | Rarely |
| Kale | Yes | No |
| Broccoli | Yes | Cover under 25°F |
| Cabbage | Yes | Light cover helpful |
| Cauliflower | Yes | Yes in hard freeze |
| Swiss Chard | Yes | Usually fine |
| Onions (from seed) | Yes | No |
| Leeks | Yes | No |
| Peas | Yes | Rarely |
These can often be transplanted 2–4 weeks before your last frost (typically mid-May here, but always watch the weather).
A simple frost cloth or row cover is usually enough protection if temperatures dip below 25°F.
Seeds That REQUIRE Stratification (Perfect for Winter Sowing)
These NEED cold exposure to break dormancy.
| Flower/Herb | Stratification Needed? |
| Lavender | Yes (30–60 days) |
| Columbine | Yes |
| Echinacea | Yes |
| Rudbeckia | Yes |
| Delphinium | Yes |
| Larkspur | Yes |
| Milkweed | Yes |
| Penstemon | Often |
| Yarrow | Often helpful |
Winter sowing naturally provides the chill period these seeds crave.
Think of it as their winter nap before spring excitement.
What About Direct Sowing Outdoors?
Some crops don’t even need containers:
- Carrots
- Radishes
- Turnips
- Beets
- Dill
- Cilantro
These can be sown directly into garden beds early — even when soil is just workable.
When Should We Start?
In Zone 6b high elevation:
- January–February: Start stratification seeds and hardy perennials.
- February–March: Winter sow cool vegetables.
- March–April: Continue successions.
If you’re reading this and there’s still snow outside? Perfect.
Snow is not the enemy. It’s insulation.
Do We Ever Need Frost Covers?
Yes — but lightly.
Even winter-sown seedlings can be vulnerable during:
- Sudden temperature plunges below 20–25°F
- Drying winds
- Late spring surprise snowstorms
Floating row cover, frost cloth, or even an old sheet works beautifully.
No plastic touching the plants — that’s just rude.
The Big Advantage in Our Climate
Because we live in a high-country climate:
- Our sunlight is strong.
- Indoor light is often insufficient.
- Temperature swings are common.
Winter sowing gives us tough, acclimated seedlings that don’t faint at the first brisk breeze.
They’ve been training for this.
Why This Is So Much Fun
There is something wildly satisfying about:
- Seeing seedlings emerge through the snow
- Opening a milk jug to find tiny green miracles
- Knowing you started your season without babying anything
It feels rebellious. Efficient. Slightly smug (in a humble community-garden sort of way).
And it’s perfect for teaching kids — they get to see nature in action.
A Little Community Garden Encouragement
If you’ve never tried winter sowing, this is your sign.
Start with:
- Lettuce
- Spinach
- Kale
- Lavender
- Columbine
- Peas
Label well (future you will be grateful).
Set them outside.
Then go inside and bake bread, read seed catalogs, or design your next garden plan.
Nature will text you when it’s ready. (Okay… it won’t. But you’ll see it.)
Final Thoughts for High Country Gardeners
Winter sowing:
- Maximizes our short growing season
- Provides natural stratification
- Produces stronger seedlings
- Reduces transplant shock
- Saves indoor space
And best of all?
It makes gardening feel like a collaboration instead of a race.
So grab those milk jugs. Roll a few seed snails. Tuck some lavender into a ziplock. Spring is coming — whether the forecast believes it or not. And when your sturdy little seedlings are thriving while others are still fussing with grow lights?
You can just smile and say, Oh, I let winter handle it.”